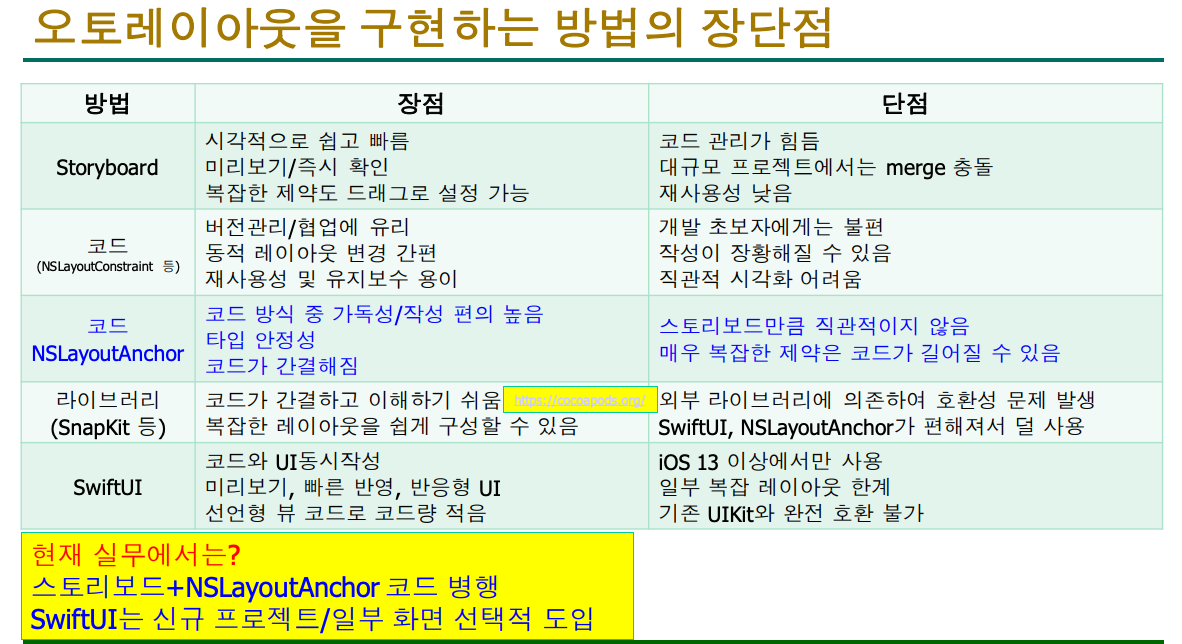
오토레이아웃을 구현하는 방법은 5가지가 있다.
크기 지정을 안하고 상대적인 크기로 지정한다.
픽셀이 아닌 포이트 단위로 지정하다.
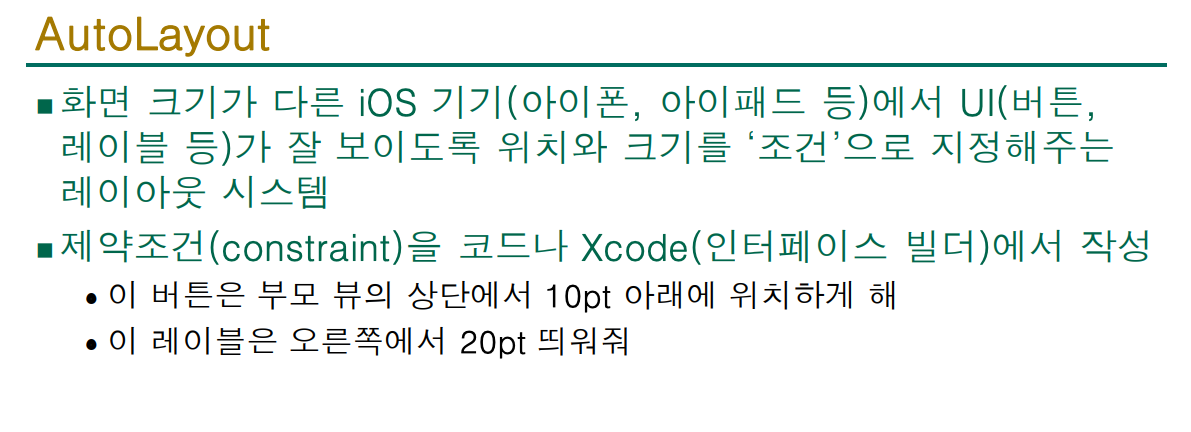
지정하는 제약조건을 constraint라고 한다.
NSLayoutAnchor를 실무적으로 사용하는 예
실무에서 NSLayoutAnchor는 스토리보드나 UI 데이터가 아닌 100% 코드로 UI를 작성할 때(Code-based UI) 오토레이아웃을 잡는 가장 표준적이고 직관적인 방법입니다.
예전 방식인 NSLayoutConstraint(item:attribute:relatedBy:...)에 비해 타입 안정성(Type Safety)이 보장되어, 예를 들어 세로축(top)을 가로축(leading)에 잘못 연결하는 실수를 컴파일 단계에서 막아줍니다.
가장 흔한 실무 예시: 카드 레이아웃 구성하기
프로필 이미지, 제목 레이블, 설명 레이블이 포함된 카드를 코드로 배치하는 실무적인 예제입니다.
import UIKit

class CustomCardView: UIView {

    // 1. UI 컴포넌트 선언
    let profileImageView: UIImageView = {
        let iv = UIImageView()
        iv.backgroundColor = .lightGray
        iv.layer.cornerRadius = 8
        iv.clipsToBounds = true
        iv.translatesAutoresizingMaskIntoConstraints = false
        return iv
    }()

    let titleLabel: UILabel = {
        let label = UILabel()
        label.text = "Gemini"
        label.font = .boldSystemFont(ofSize: 18)
        label.translatesAutoresizingMaskIntoConstraints = false
        return label
    }()

    let descriptionLabel: UILabel = {
        let label = UILabel()
        label.text = "iOS Developer / AI Collaborator"
        label.font = .systemFont(ofSize: 14)
        label.textColor = .darkGray
        label.numberOfLines = 0
        label.translatesAutoresizingMaskIntoConstraints = false
        return label
    }()

    override init(frame: CGRect) {
        super.init(frame: frame)
        setupUI()
    }

    required init?(coder: NSCoder) {
        fatalError("init(coder:) has not been implemented")
    }

    // 2. 레이아웃 설정
    private func setupUI() {
        backgroundColor = .white
        layer.cornerRadius = 12

        // 반드시 부모 뷰에 먼저 addSubview를 해야 앵커를 잡을 수 있습니다.
        addSubview(profileImageView)
        addSubview(titleLabel)
        addSubview(descriptionLabel)

        // 3. NSLayoutConstraint.activate를 사용해 한 번에 활성화 (성능상 이점)
        NSLayoutConstraint.activate([
            // 이미지 뷰: 탑, 리딩에서 16pt 띄우고 크기는 60x60 고정
            profileImageView.topAnchor.constraint(equalTo: self.topAnchor, constant: 16),
            profileImageView.leadingAnchor.constraint(equalTo: self.leadingAnchor, constant: 16),
            profileImageView.widthAnchor.constraint(equalToConstant: 60),
            profileImageView.heightAnchor.constraint(equalToConstant: 60),

            // 타이틀 레이블: 이미지의 오른쪽(Trailing)에 위치, 탑은 이미지와 맞춤
            titleLabel.topAnchor.constraint(equalTo: profileImageView.topAnchor),
            titleLabel.leadingAnchor.constraint(equalTo: profileImageView.trailingAnchor, constant: 12),
            titleLabel.trailingAnchor.constraint(equalTo: self.trailingAnchor, constant: -16),

            // 설명 레이블: 타이틀 레이블 아래에 위치, 바텀은 카드 바닥과 연결하여 동적 높이 확보
            descriptionLabel.topAnchor.constraint(equalTo: titleLabel.bottomAnchor, constant: 4),
            descriptionLabel.leadingAnchor.constraint(equalTo: titleLabel.leadingAnchor),
            descriptionLabel.trailingAnchor.constraint(equalTo: titleLabel.trailingAnchor),
            descriptionLabel.bottomAnchor.constraint(equalTo: self.bottomAnchor, constant: -16)
        ])
    }
}
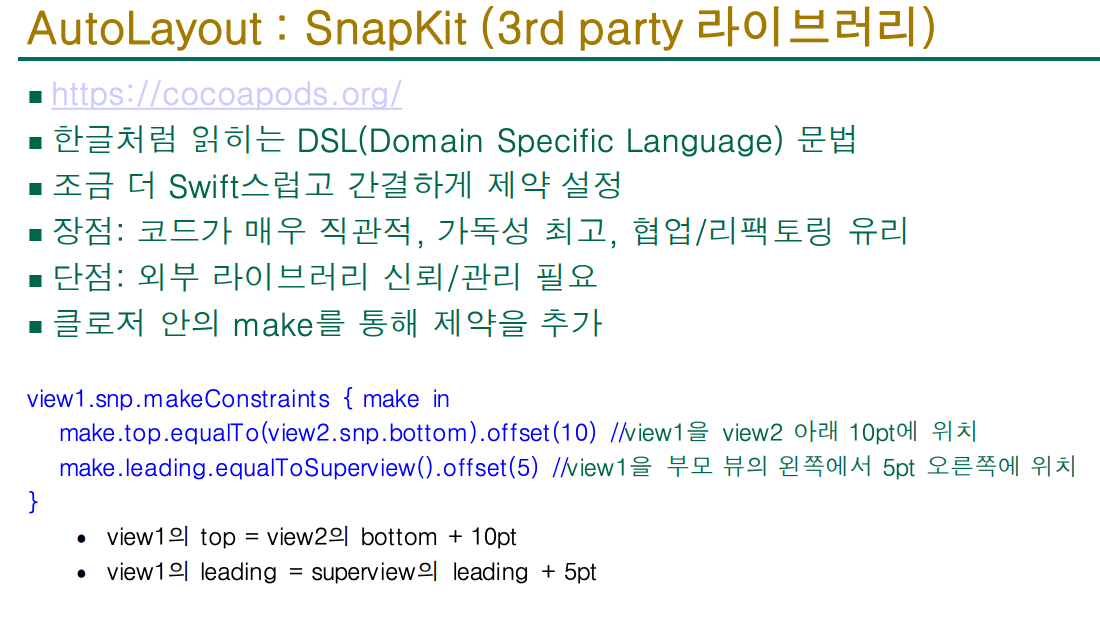
AutoLayout에서 가장 많이 사용하는 외부 라이브러리가 Snapkit이다.
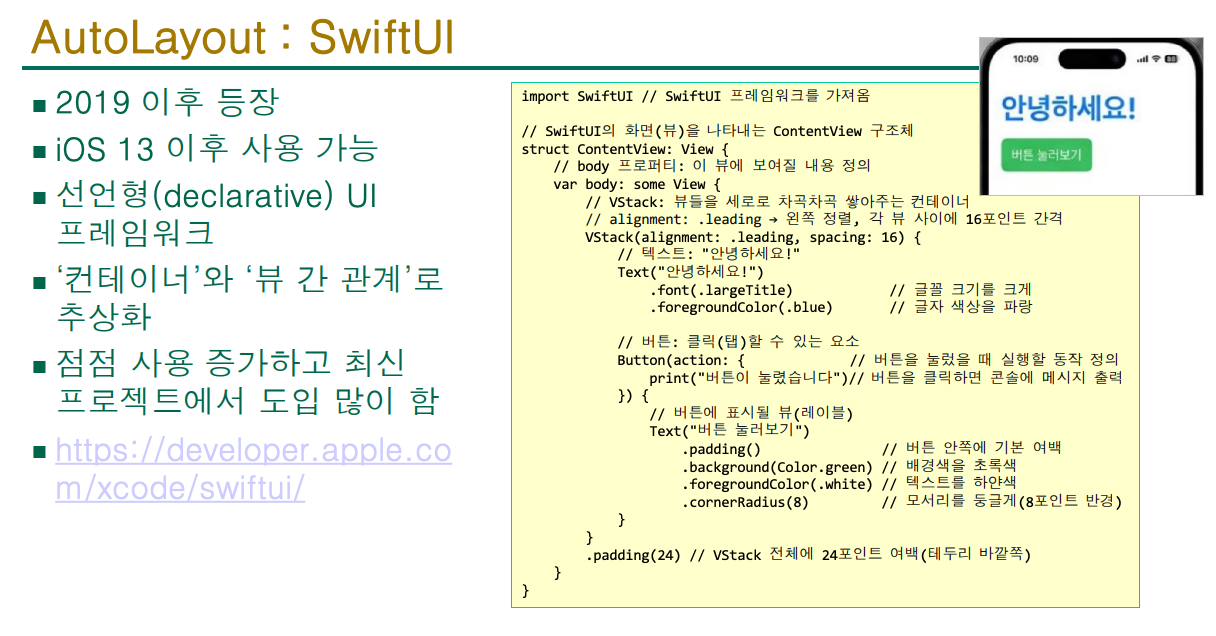
Leading/Trailing, Top/Bottom, Heigh/Width
Leading: 왼쪽, Trailing: 오른쪽
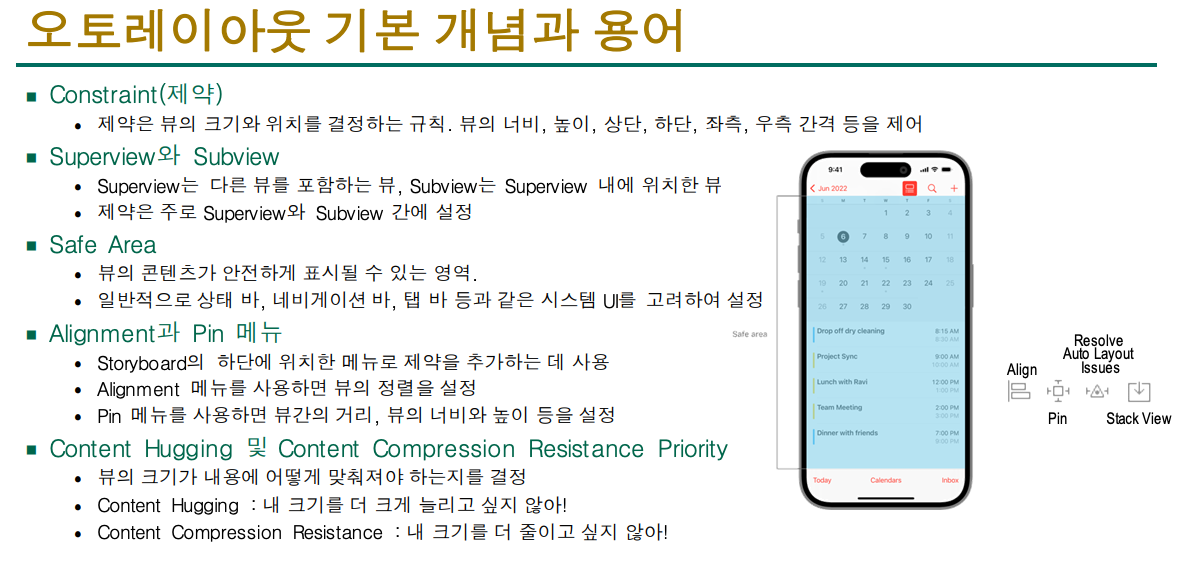
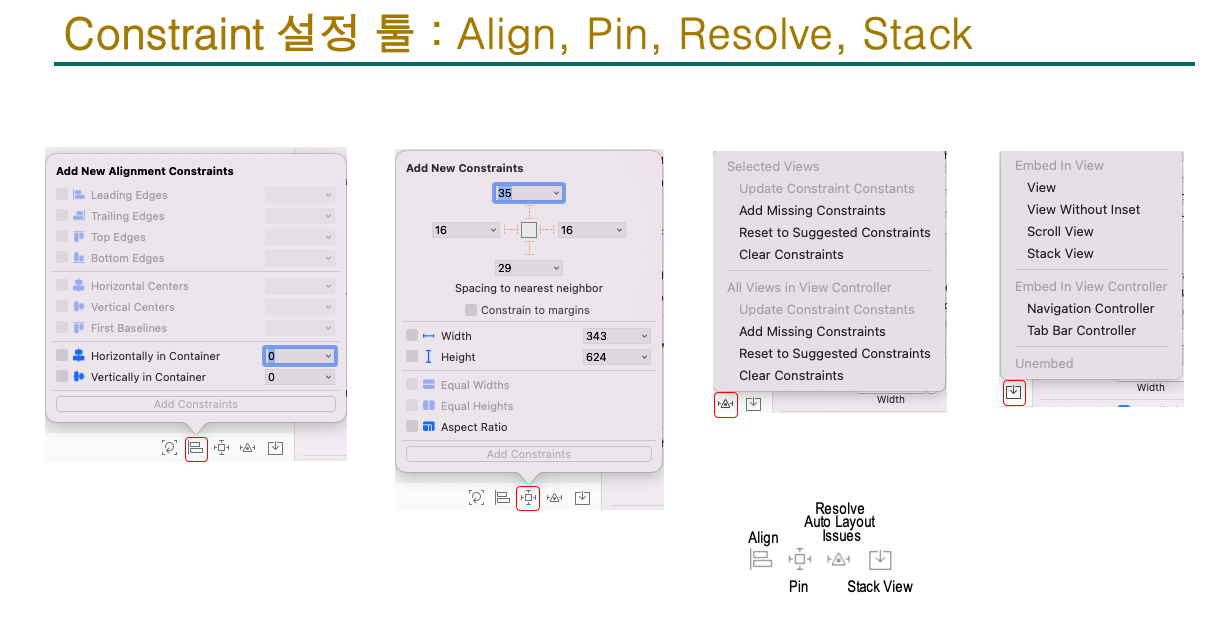
위 4개의 툴을 이용하여 constraint를 잡는다.
size inspector
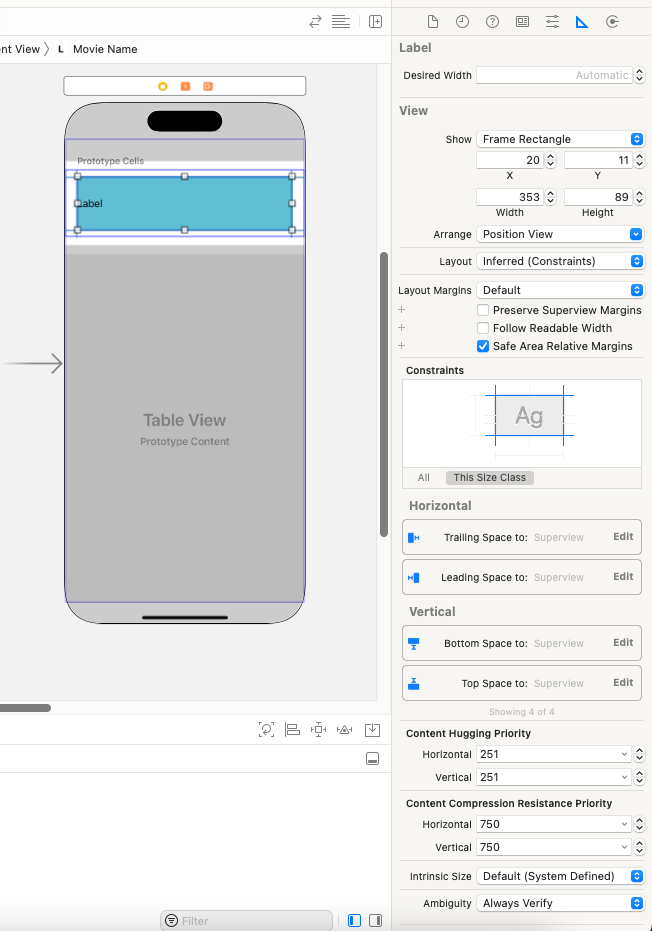
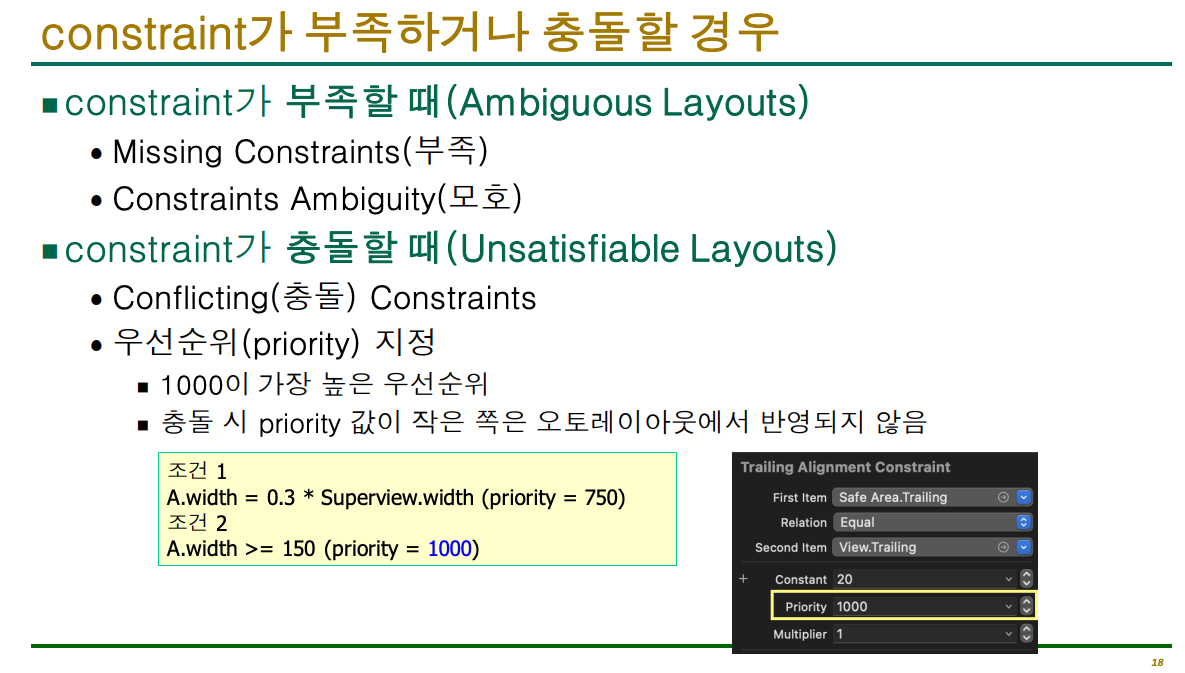
콘텐츠 허깅(Content Hugging)과 컴프레션 저항(Compression Resistance)
허깅과 컴프레션 조건은, 뷰의 사이즈가 담고 있는 콘텐츠보다 크지도 않고(허깅), 작지도 않게 (컴프레션) 맞춰주는 조건
허깅
-고유 사이즈 이상으로 '늘어나지 않으려고 하는' 조건
-줄어드는 것은 아님, 뷰가 가능한 작게 유지하려는 성질
컴프레션
-고유 사이즈 이하로 '줄어들지 않으려고 하는' 조건
-늘어나는 것은 아님, 뷰가 내용이 잘리지 않도록 유지하려는 성질
허깅의 우선순위 디폴트 값은 250,컴프레션은 750
-A뷰의 컴프레션 constraint와 B뷰의 허깅 constraint가 충돌하면 컴프레션 constraint가 우선
-컨텐츠가 잘리는 것보다는 뷰가 늘어나게 함
-개발자가 설정하는 constraint 우선순위 기본 값: 1000
-컴프레션 우선순위: 750
-허깅 선순위: 250
내가 설정한 constraint 보다 콘텐츠 사이즈 조건이 작을 때 (공간이 부족)
-잘리면 안되는 UI의 컴프레션 우선순위를 높임
내가 설정한 constraint 보다 컨텐츠 사이즈 조건이 클 때 (공간이 남음)
-늘어나면 안되는 UI의 허깅 우선순위를 높임
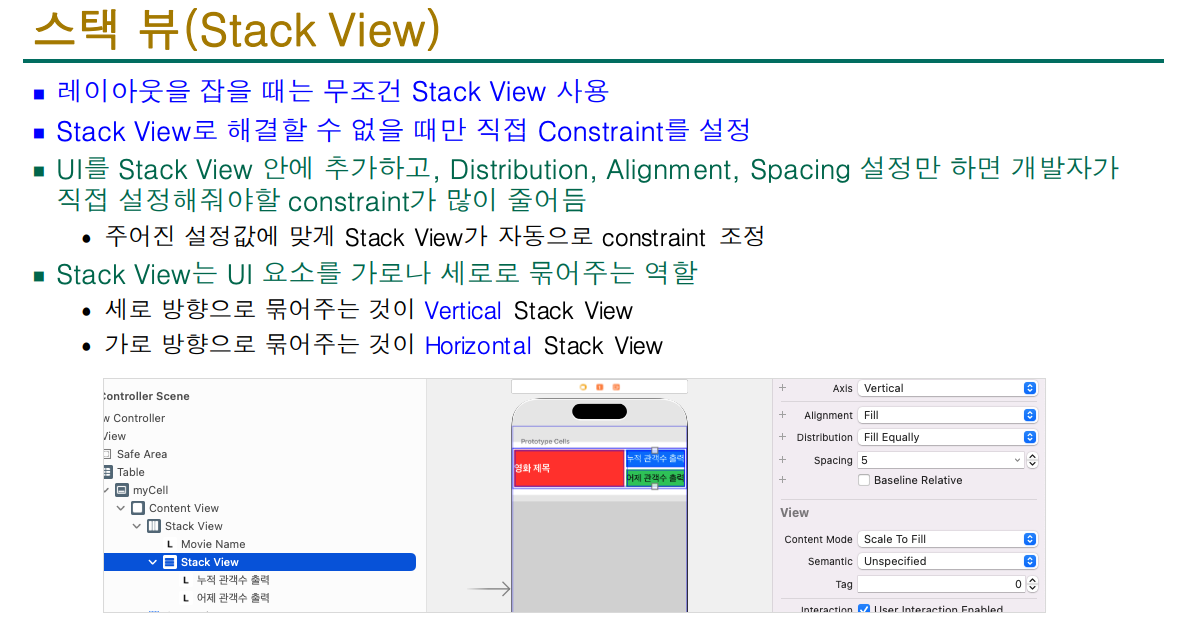
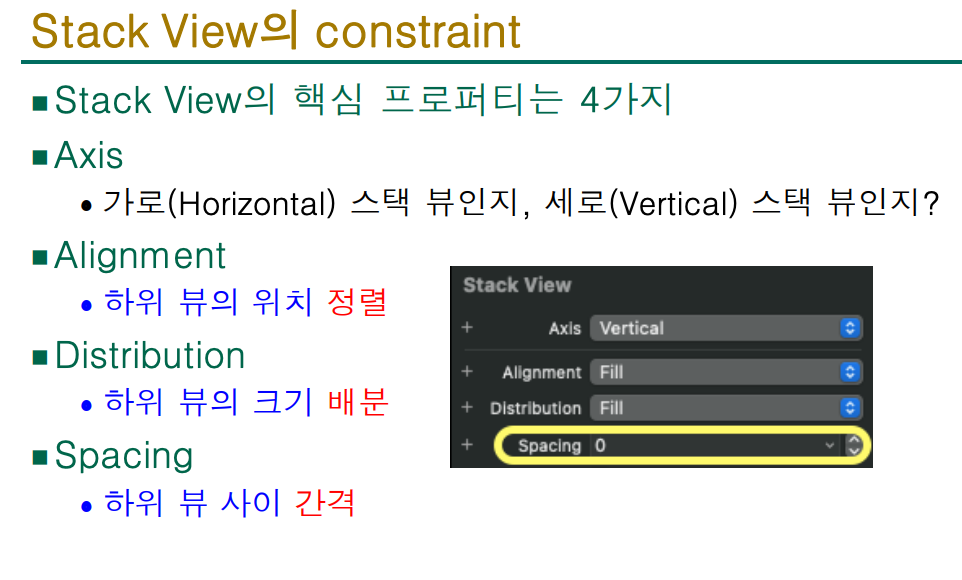
//
//  ViewController.swift
//  Moviekkr
//
//  Created by 1 on 2026/04/28.
//

import UIKit

// MARK: - [1] API 응답 데이터 파싱을 위한 JSON 데이터 모델 (Codable)

/// JSON 데이터의 최상위 루트 구조체
struct MovieData : Codable {
    let boxOfficeResult : BoxOfficeResult // "boxOfficeResult" 키의 객체와 매핑
}

/// 박스오피스 결과 데이터를 담고 있는 구조체
struct BoxOfficeResult : Codable {
    let dailyBoxOfficeList : [DailyBoxOfficeList] // "dailyBoxOfficeList" 키의 배열 데이터와 매핑
}

/// 영화 한 편의 상세 정보를 담고 있는 구조체
struct DailyBoxOfficeList : Codable {
    let movieNm : String  // 영화 제목
    let audiCnt : String  // 해당 일자 관객 수
    let audiAcc : String  // 누적 관객 수
    let rank : String     // 박스오피스 순위
}


// MARK: - [2] 메인 뷰 컨트롤러 클래스 선언 및 프로토콜 채택
/// UITableViewDelegate(테이블뷰 동작 관리)와 UITableViewDataSource(테이블뷰 데이터 공급) 프로토콜을 채택함
class ViewController: UIViewController, UITableViewDelegate, UITableViewDataSource {

    // MARK: - 인스턴스 변수 및 프로퍼티
    @IBOutlet weak var table: UITableView! // 스토리보드의 테이블 뷰와 연결된 아웃렛 변수

    var movieData : MovieData? // 서버에서 받아와서 디코딩한 영화 데이터를 저장할 옵셔널 변수

    // 영화진흥위원회 일별 박스오피스 API 주소 (맨 뒤의 targetDt= 값은 동적으로 결합 예정)
    var movieURL = "https://kobis.or.kr/kobisopenapi/webservice/rest/boxoffice/searchDailyBoxOfficeList.json?key=eaa1c89ff79f8f288c9366ac031f7510&targetDt="

    // MARK: - 라이프사이클 메서드
    override func viewDidLoad() {
        super.viewDidLoad()

        // 테이블 뷰의 대리자(Delegate)와 데이터 소스(DataSource)를 현재 뷰 컨트롤러(self)로 지정
        table.dataSource = self
        table.delegate = self

        // URL 주소 끝에 어제 날짜 문자열(예: 20260518)을 붙여 완전한 주소 생성
        movieURL += makeYesterdayString()

        // API 서버로부터 데이터를 요청하고 테이블 뷰를 갱신하는 함수 호출
        getData()
    }

    // MARK: - 날짜 계산 유틸리티 함수
    /// 어제 날짜를 "yyyyMMdd" 형태의 문자열로 반환하는 함수
    func makeYesterdayString() -> String {
        // 1. 현재 날짜(Date())에서 하루(.day, value: -1)를 뺀 날짜 계산 (실패 시 오늘 날짜 반환)
        let yesterday = Calendar.current.date(byAdding: .day, value: -1, to: Date()) ?? Date()

        // 2. 날짜를 문자열로 바꾸기 위한 Formatter 생성
        let formatter = DateFormatter()

        // 3. API가 요구하는 형식(yyyyMMdd) 지정
        formatter.dateFormat = "yyyyMMdd"

        // 4. 변환된 어제 날짜 문자열 반환
        return formatter.string(from: yesterday)
    }

    // MARK: - 네트워킹 및 데이터 파싱 함수
    /// API 서버에서 데이터를 비동기적으로 가져와 파싱하고 화면을 갱신하는 함수
    func getData() {
        // 1. 완성된 문자열 URL을 URL 구조체 객체로 안전하게 변환 (실패 시 함수 종료)
        guard let url = URL(string: movieURL) else { return }

        // 2. 기본 설정(.default)을 사용하는 URLSession 인스턴스 생성
        let session = URLSession(configuration: .default)

        // 3. 특정 URL에 데이터를 요청하는 비동기 데이터 태스크(Data Task) 정의
        let task = session.dataTask(with: url) { data, response, error in

            // 3-1. 에러가 발생했다면 에러 처리를 따로 하지 않고 즉시 리턴(통신 실패 대응)
            if error != nil { return }

            // 3-2. 옵셔널인 data를 안전하게 언래핑하여 JSONdata에 할당 (데이터가 없으면 리턴)
            guard let JSONdata = data else { return }

            // 3-3. 받아온 Raw Binary 데이터를 UTF-8 형태의 문자열로 바꾼 뒤 콘솔에 출력 (디버깅용)
            let dataString = String(data: JSONdata, encoding: .utf8)
            print(dataString!)

            // 4. JSON 데이터를 Swift 구조체로 변환해줄 디코더 인스턴스 생성
            let decoder = JSONDecoder()

            do {
                // 4-1. JSONdata를 위에서 정의한 MovieData 구조체 타입으로 변환(디코딩) 시도
                let decodedData = try decoder.decode(MovieData.self, from: JSONdata)

                // 4-2. 디코딩이 잘 되었는지 확인하기 위해 1등 영화의 제목을 콘솔에 출력
                print(decodedData.boxOfficeResult.dailyBoxOfficeList[0].movieNm)

                // 4-3. 파싱 완료된 데이터를 클래스 멤버 변수인 movieData에 저장
                self.movieData = decodedData

                // 🚨 주의/피드백: 백그라운드 스레드에서 UI를 바꿀 때는 반드시 Main 스레드에서 실행해야 합니다.
                // 단, 실무에서는 간혹 데드락(Deadlock) 위험이 있는 .sync 대신 안전한 .async 사용을 권장합니다.
                DispatchQueue.main.sync {
                    self.table.reloadData() // 데이터를 새로 받았으니 테이블 뷰 화면을 다시 그리도록 명령
                }

            } catch {
                // 4-4. 디코딩 과정에서 구조체 매핑 실패 등의 에러가 발생하면 에러 내용을 콘솔에 출력
                print(error)
            }
        }

        // 5. 정의한 데이터 태스크를 실제로 실행(네트워크 요청 시작)
        task.resume()
    }


    // MARK: - [3] UITableViewDataSource & Delegate 구현 메서드

    /// 테이블 뷰의 한 섹션당 표시할 셀(행)의 개수를 설정하는 메서드
    func tableView(_ tableView: UITableView, numberOfRowsInSection section: Int) -> Int {
        // 일별 박스오피스는 항상 10개의 데이터를 주기 때문에 고정값 10을 리턴
        return 10
    }

    /// 테이블 뷰의 전체 섹션 개수를 설정하는 메서드 (기본값 1개)
    func numberOfSections(in tableView: UITableView) -> Int {
        return 1
    }

    /// 유저가 특정 행(Row)을 터치하여 선택했을 때 실행되는 동작 정의 메서드
    func tableView(_ tableView: UITableView, didSelectRowAt indexPath: IndexPath) {
        // 선택된 행의 섹션과 행 번호 정보를 콘솔에 출력 (디버깅용)
        print(indexPath.description)
    }

    /// 테이블 뷰의 각 행에 들어갈 셀을 설정하고 데이터를 바인딩하는 핵심 메서드
    func tableView(_ tableView: UITableView, cellForRowAt indexPath: IndexPath) -> UITableViewCell {

        // 1. 재사용 큐에서 "myCell" 식별자를 가진 셀을 꺼내오고, 커스텀 셀 클래스인 MyTableViewCell로 강제 타입 캐스팅
        let cell = tableView.dequeueReusableCell(withIdentifier: "myCell", for: indexPath) as! MyTableViewCell

        // 2. [기본 데이터 세팅] 데이터 모델에서 현재 행(indexPath.row)에 맞는 영화 정보를 꺼내 셀의 각 레이블에 기본 바인딩
        cell.movieName.text = movieData?.boxOfficeResult.dailyBoxOfficeList[indexPath.row].movieNm
        cell.audiAccumulate.text = movieData?.boxOfficeResult.dailyBoxOfficeList[indexPath.row].audiAcc
        cell.audiCount.text = movieData?.boxOfficeResult.dailyBoxOfficeList[indexPath.row].audiCnt

        // 3. [어제 관객 수 포맷팅] 당일 관객 수 값이 존재한다면 안전하게 꺼내옴
        if let aCnt = movieData?.boxOfficeResult.dailyBoxOfficeList[indexPath.row].audiCnt {
            let numF = NumberFormatter()
            numF.numberStyle = .decimal // 3자리마다 쉼표(,)를 찍어주는 스타일 설정

            let aCount = Int(aCnt)! // 문자열인 관객 수를 정수형(Int)으로 변환
            let result = numF.string(for: aCount)! + "명" // 숫자를 포맷팅하고 뒤에 "명"을 붙임

            cell.audiCount.text = "어제 관객 : \(result)" // 셀의 당일 관객 수 레이블 텍스트 갱신
        }

        // 4. [누적 관객 수 포맷팅] 누적 관객 수 값이 존재한다면 안전하게 꺼내옴
        if let aAcc = movieData?.boxOfficeResult.dailyBoxOfficeList[indexPath.row].audiAcc {
            // 숫자를 천 단위로 콤마(,) 찍어주는 NumberFormatter 생성
            let numF = NumberFormatter()
            numF.numberStyle = .decimal // 숫자 스타일을 3자리마다 쉼표가 찍히는 형식으로 지정

            // aAcc는 문자열로 되어 있으니 Int로 변환 (무조건 변환된다고 가정해서 강제 언래핑)
            let aAcc1 = Int(aAcc)!

            // 숫자를 포맷해서 문자열로 변환한 뒤, "명"을 붙임
            let result = numF.string(for: aAcc1)! + "명"

            // 셀의 레이블에 "누적 : 123,456명" 같은 문구를 셋팅
            cell.audiAccumulate.text = "누적 : \(result)"
        }

        // 데이터 설정이 끝난 최종 셀 객체를 반환하여 화면에 표시함
        return cell
    }

    /// 테이블 뷰 상단에 표시될 헤더(Header) 타이틀을 설정하는 메서드
    func tableView(_ tableView: UITableView, titleForHeaderInSection section: Int) -> String? {
        // 박스오피스 문구와 함께 어제 날짜를 보여줌
        return "🍿박스오피스(영화진흥위원회제공:" + makeYesterdayString() + ")🍿"
    }

    /// 테이블 뷰 하단에 표시될 푸터(Footer) 타이틀을 설정하는 메서드
    func tableView(_ tableView: UITableView, titleForFooterInSection section: Int) -> String? {
        // 제작자 정보를 하단 푸터에 상시 표기
        return "made by ggongs 김경래"
    }
}
리팩토링 코드
1. Model (데이터 모델 구조체 개편)
구조체 이름과 프로퍼티명을 Swift 스타일(CamelCase)로 유지하되, 코드가 깔끔해지도록 내부 배열을 바로 꺼내 쓸 수 있게 연산 프로퍼티를 추가했습니다.
import Foundation

struct MovieData: Codable {
    let boxOfficeResult: BoxOfficeResult

    // ViewController에서 접근하기 쉽도록 헬퍼 프로퍼티 추가
    var dailyMovies: [DailyBoxOfficeList] {
        return boxOfficeResult.dailyBoxOfficeList
    }
}

struct BoxOfficeResult: Codable {
    let dailyBoxOfficeList: [DailyBoxOfficeList]
}

struct DailyBoxOfficeList: Codable {
    let movieNm: String  // 영화 제목
    let audiCnt: String  // 당일 관객수
    let audiAcc: String  // 누적 관객수
    let rank: String     // 순위
}
2. Service (네트워크 전송 및 비동기 처리 분리)
네트워크 통신만 전담하는 구조체입니다. 탈출 클로저(@escaping)를 사용하여 결과를 뷰 컨트롤러에 안전하게 던져줍니다.
import Foundation

struct MovieService {
    private let apiKey = "eaa1c89ff79f8f288c9366ac031f7510"
    private let baseURL = "https://kobis.or.kr/kobisopenapi/webservice/rest/boxoffice/searchDailyBoxOfficeList.json"

    /// API에서 데이터를 비동기로 받아오는 함수
    func fetchDailyBoxOffice(completion: @escaping (MovieData?) -> Void) {
        let targetDate = makeYesterdayString()
        let urlString = "\(baseURL)?key=\(apiKey)&targetDt=\(targetDate)"

        guard let url = URL(string: urlString) else {
            completion(nil)
            return
        }

        URLSession.shared.dataTask(with: url) { data, _, error in
            // 에러가 있거나 데이터가 없으면 nil 반환
            guard error == nil, let jsonData = data else {
                completion(nil)
                return
            }

            // 디코딩 시도
            do {
                let decodedData = try JSONDecoder().decode(MovieData.self, from: jsonData)
                completion(decodedData)
            } catch {
                print("디코딩 실패: \(error)")
                completion(nil)
            }
        }.resume()
    }

    /// 어제 날짜를 yyyyMMdd 형식으로 반환하는 헬퍼 함수
    func makeYesterdayString() -> String {
        let yesterday = Calendar.current.date(byAdding: .day, value: -1, to: Date()) ?? Date()
        let formatter = DateFormatter()
        formatter.dateFormat = "yyyyMMdd"
        return formatter.string(from: yesterday)
    }
}
3. Custom Cell (데이터 매핑 역할을 셀에게 위임)
NumberFormatter 세팅과 텍스트 변경 로직을 커스텀 셀 내부로 숨깁니다. ViewController 코드가 획기적으로 줄어듭니다.
import UIKit

class MyTableViewCell: UITableViewCell {
    @IBOutlet weak var movieName: UILabel!
    @IBOutlet weak var audiCount: UILabel!
    @IBOutlet weak var audiAccumulate: UILabel!

    // 숫자를 3자리마다 쉼표(,)를 찍어주는 포맷터 (매번 생성하지 않도록 정적 변수로 선언하여 성능 최적화)
    private static let numberFormatter: NumberFormatter = {
        let formatter = NumberFormatter()
        formatter.numberStyle = .decimal
        return formatter
    }()

    /// 셀에 데이터를 안전하게 설정하는 함수
    func configure(with movie: DailyBoxOfficeList) {
        movieName.text = movie.movieNm

        // 당일 관객수 문자열 -> Int 안전하게 변환 후 포맷팅
        if let countInt = Int(movie.audiCnt),
           let formattedCount = MyTableViewCell.numberFormatter.string(from: NSNumber(value: countInt)) {
            audiCount.text = "어제 관객 : \(formattedCount)명"
        } else {
            audiCount.text = "어제 관객 : 정보 없음"
        }

        // 누적 관객수 문자열 -> Int 안전하게 변환 후 포맷팅
        if let accInt = Int(movie.audiAcc),
           let formattedAcc = MyTableViewCell.numberFormatter.string(from: NSNumber(value: accInt)) {
            audiAccumulate.text = "누적 : \(formattedAcc)명"
        } else {
            audiAccumulate.text = "누적 : 정보 없음"
        }
    }
}
4. ViewController (컨트롤러 역할에만 집중)
네트워크와 데이터 가공 로직이 빠져나가서 프로토콜 구현 및 UI 제어라는 본연의 역할만 남았습니다. 매우 깔끔하고 직관적입니다.
import UIKit

class ViewController: UIViewController {

    // MARK: - Outlets
    @IBOutlet weak var table: UITableView!

    // MARK: - Properties
    private let movieService = MovieService()
    private var movies: [DailyBoxOfficeList] = [] // 옵셔널 대신 빈 배열로 시작하여 런타임 에러 방지

    // MARK: - Lifecycle
    override func viewDidLoad() {
        super.viewDidLoad()
        setupTableView()
        loadMovieData()
    }

    // MARK: - Setup
    private func setupTableView() {
        table.dataSource = self
        table.delegate = self
    }

    private func loadMovieData() {
        movieService.fetchDailyBoxOffice { [weak self] movieData in
            guard let self = self, let data = movieData else { return }

            // 받아온 데이터를 저장
            self.movies = data.dailyMovies

            // 🚨 반드시 .async를 사용하여 메인 스레드에서 안정적으로 UI 리로드
            DispatchQueue.main.async {
                self.table.reloadData()
            }
        }
    }
}

// MARK: - UITableViewDataSource, UITableViewDelegate Extension으로 분리 (가독성 향상)
extension ViewController: UITableViewDataSource, UITableViewDelegate {

    func tableView(_ tableView: UITableView, numberOfRowsInSection section: Int) -> Int {
        // 하드코딩된 10 대신 실제 데이터의 개수를 유동적으로 반환
        return movies.count
    }

    func numberOfSections(in tableView: UITableView) -> Int {
        return 1
    }

    func tableView(_ tableView: UITableView, cellForRowAt indexPath: IndexPath) -> UITableViewCell {
        guard let cell = tableView.dequeueReusableCell(withIdentifier: "myCell", for: indexPath) as? MyTableViewCell else {
            return UITableViewCell()
        }

        // 현재 행에 맞는 영화 데이터를 셀에 넘겨서 스스로 그리게 함
        let movie = movies[indexPath.row]
        cell.configure(with: movie)

        return cell
    }

    func tableView(_ tableView: UITableView, didSelectRowAt indexPath: IndexPath) {
        print("선택된 행: \(indexPath.row), 영화 제목: \(movies[indexPath.row].movieNm)")
        tableView.deselectRow(at: indexPath, animated: true) // 터치 후 하이라이트 자연스럽게 해제
    }

    func tableView(_ tableView: UITableView, titleForHeaderInSection section: Int) -> String? {
        let dateString = movieService.makeYesterdayString()
        return "🍿박스오피스(영화진흥위원회제공: \(dateString))🍿"
    }

    func tableView(_ tableView: UITableView, titleForFooterInSection section: Int) -> String? {
        return "made by ggongs 김경래"
    }
}
'iOS앱개발' 카테고리의 다른 글
| iOS실무 13주차 (0) | 2026.06.02 |
|---|---|
| iOS실무 12주차 (0) | 2026.05.26 |
| iOS실무 10주차 (0) | 2026.05.12 |
| iOS실무 9주차 (0) | 2026.04.28 |
| iOS실무 7주차 (0) | 2026.04.14 |